
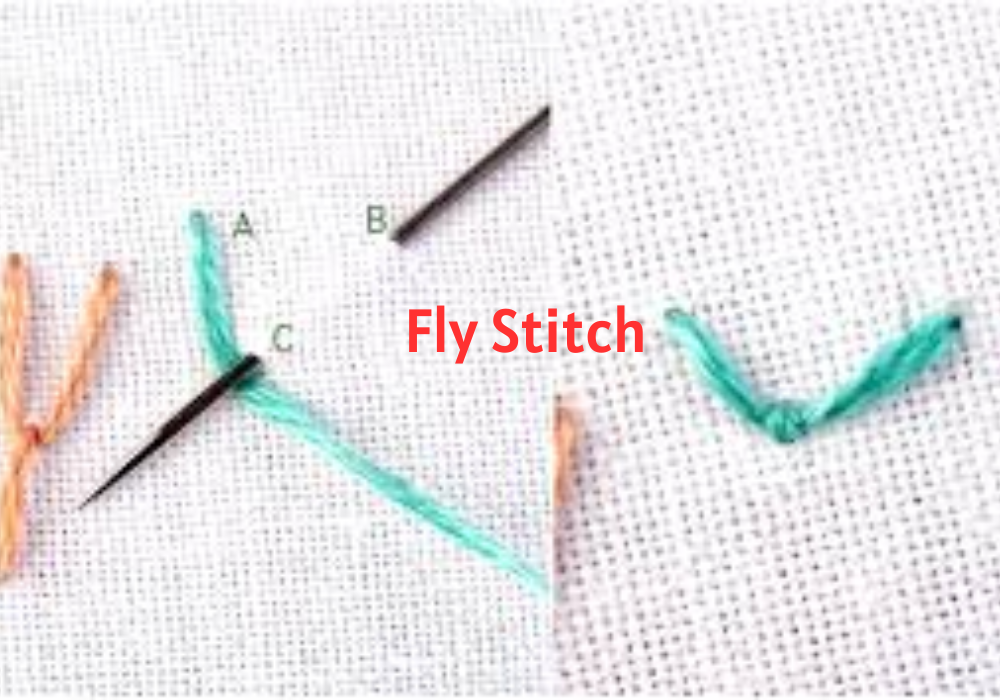
Fly stitch is a basic embroidery stitch that creates a V-shape. It is commonly used to create leaves, wings, and other decorative elements in embroidery projects. To create a fly stitch, bring the needle up through the fabric and make a diagonal stitch to the right or left. Then, bring the needle back down through the fabric at the center of the stitch to complete the V-shape. This stitch can be worked in various thread thicknesses and colors and combined with other stitches to create unique effects. In short, the Fly stitch is an essential stitch when it comes to nature embroidery.
Step By Step Guide To Learn Fly Stitch
Fly stitch is a basic embroidery stitch that is easy to learn with practice. Here are some steps you can follow to learn the fly stitch:
- Thread your needle and knot the end of the thread.
- Bring the needle up through the fabric at the starting point of your stitch.
- Bring the needle back down through the fabric a short distance from the starting point, making a small straight stitch.
- Bring the needle back up through the fabric on the line of the stitch, slightly to the right of the starting point.
- Wrap the thread around the needle from right to left, creating a small loop.
- Insert the needle back down into the fabric, just to the left of where it came up.
- Pull the thread through the fabric, holding onto the loop with your finger to prevent it from slipping.
- Repeat the process to create a row of fly stitches.
With some practice, you should be able to create neat and even fly stitches. You can also watch video tutorials online for further guidance.
More Stitch Tutorials: Blanket Stitch Embroidery
Variations and Tips for Fly Stitch:
Fly stitch is a popular embroidery stitch that creates a V-shaped design. This stitch is commonly used for creating leaves, wings, and other decorative elements in embroidery projects. Here are some variations and tips for creating fly stitch:
Single Fly Stitch:
Create a single fly stitch by bringing the needle up from the back of the fabric and making a diagonal stitch to the right or left. Then, bring the needle back down through the fabric at the center of the stitch to complete the V shape.
Double Fly Stitch:
Create a double fly stitch by making two diagonal stitches, each pointing in opposite directions. Then, bring the needle back down through the center of the two stitches to complete the V shape.
Open Fly Stitch:
The open fly stitch is a variation of the traditional fly stitch where a small gap is left between the two legs of the V-shape. This stitch can create a lacy effect and is commonly used in floral designs and decorative borders.
Alternating Fly Stitch:
This variation is created by alternating the direction of the V shapes, creating a zig-zag pattern. Start by creating a single fly stitch to the right, then create another one to the left. Repeat this pattern to create a line of alternating V shapes.
Whipped Fly Stitch:
To add texture and dimension to your fly stitch, you can whip the stitch with a contrasting color of thread. After completing the V shape of the fly stitch, bring the needle up through the center and loop the contrasting thread around the stitch legs. Repeat this process along the length of the stitch to create a whipped effect.
Tips: To create a neat and tidy fly stitch, keep the stitches evenly spaced and the V shapes uniform in size. You can also experiment with different thread thicknesses and colors to create unique effects.