
Interested in learning about backstitch embroidery? Popular hand embroidery, known as backstitch embroidery, is used to reinforce and strengthen seams. It has many functions and applications and is still used by many luxury clothes designers to create their masterpieces. Even if you are a beginner, learning how to backstitch will be handy if you need to mend or hand-sew a project.
Simple Guide On BackStitch Embroidery
Step1- Make Your Fabric Stitch-Ready
- Make a mark with your embroidery transfer pen on the fabric. You can trace the line using any flat edge. A ruler will be ideal if you have one on hand. Before drawing your line, if required, flatten your fabric with an iron.
- Insert the fabric firmly into the embroidery hoop. Secure it if you can use it, so your complete line fits inside the hoop.
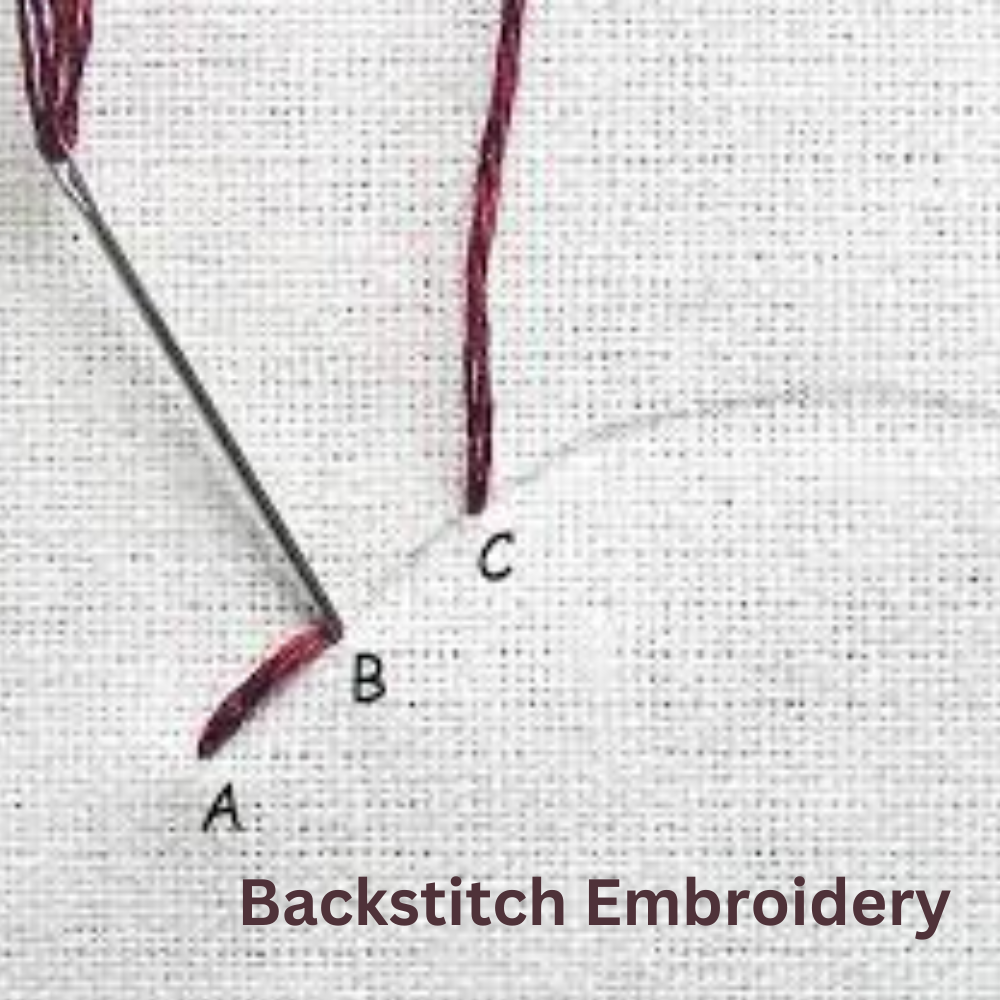
Step2- Embroider Your Line
- To thread the needle for embroidery, you typically leave a short and a long floss “tail.” Your stitching will be done with the long tail. On the other hand, the shorter tail forms the end of your floss, which you will use to weave through your last stitches or make a knot after your work.
- The backstitch gets its name because you begin your line one stitch deep and then go back to the beginning. Set your initial stitch at a distance from the beginning of your line that you have determined for your stitch length. To prevent your thread from ripping out your stitch while just beginning out, you can tie a tiny knot at the end of it. You may use a tiny bit of tape to keep this floss tail in place. The floss will keep in place on its own after a few stitches.
- At the beginning of the line, you traced back through the fabric with your floss to complete your first stitch.
- Continue with your line’s second stitch. From back to front, stitch through the fabric with an equal gap before the first stitch. To make your line appear uniform, strive to make each stitch roughly the same size. Smaller stitches will make the line appear smoother when sewing around curves. Longer stitches can be used to create straight lines without affecting the final appearance of the line.
- You can complete the second stitch by re-entering your beginning position with your floss. This avoids gaps between your stitches and keeps them in a line. Every stitch will terminate by going through the starting position of the one before it.
- In this manner, stitch until you reach the end of the traced line.
Step 3- Complete the work on the back.
- To secure it, weave the remaining floss end into the last stitch you made.
- Make a little knot to keep your floss in place. Next, create a tiny loop and tie a knot to hold the floss. After tying the knot and tightening it, trim any extra floss.
WHY DO YOU NEED AN EMBROIDERY BACKSTITCH, AND WHAT IS ITS PURPOSE?
The ability to make sturdy seams without the use of a sewing machine is one of the backstitch’s principal uses. Solid and long-lasting seams are stitched with backstitches. The backstitch is more durable than a regular running stitch. A backstitch in embroidery can help when you only need a one-time fix.
The decor is a commonplace application for backstitching. Using various backstitching techniques, you may create ornamental seams and backstitch embroidery patterns on your clothing.
If you want hand stitches that will hold your clothing together even after a tear, a backstitch is what you need. When you want an artistic look, use the thread visible in the back stitch embroidery patterns.